


Automating Microsoft Sentinel Deployment with Azure DevOps CI/CD
🚀 Revolutionise Your Microsoft Sentinel Deployments! 🚀

Introduction
In today’s rapidly evolving cybersecurity landscape, organisations face increasing pressure to deploy, configure, and maintain security solutions efficiently and consistently. Microsoft Sentinel, Microsoft’s cloud-native SIEM and SOAR solution, provides powerful security monitoring capabilities but can involve complex, time-consuming deployment processes that are prone to human error.
This blog explores a comprehensive solution for automating Microsoft Sentinel deployments using Azure DevOps pipelines. By combining infrastructure-as-code (Bicep) with PowerShell automation, this solution streamlines the entire deployment process from infrastructure provisioning to content configuration.
The Challenge of Manual Sentinel Deployment
Deploying Microsoft Sentinel manually involves numerous steps, including:
Creating a Log Analytics workspace
Enabling the Sentinel solution
Deploying individual content solutions (Microsoft 365, Azure Activity, etc.)
Configuring analytics rules with appropriate severities and thresholds
Setting up workbooks for visualisation
These tasks are not only time-consuming but also difficult to replicate consistently across multiple environments. A single misconfiguration can lead to missed security alerts or excessive alert noise. Furthermore, as security requirements evolve, maintaining and updating these components manually becomes increasingly challenging.
Solution Overview: Sentinel-As-Code
This solution, Sentinel-As-Code, provides a robust framework for automating the entire Microsoft Sentinel deployment process using Azure DevOps pipelines. The project combines Bicep templates for infrastructure provisioning with a powerful PowerShell script for deploying Sentinel solutions, analytics rules, and workbooks.
Repository Structure
├── Bicep/.                  # Bicep templates for infrastructure
│   ├── main.bicep           # Main deployment template
│   └── sentinel.bicep       # Sentinel-specific resources
├── Scripts/                 # PowerShell automation scripts
│   ├── README.md            # Documentation for Set-SentinelContent.ps1
│   └── Set-SentinelContent.ps1  # Sentinel content deployment script
├── README.md                # Project documentation
└── azure-pipelines.yml      # Azure DevOps pipeline definition
Setting Up the Project in Azure DevOps
Let’s walk through the detailed process of setting up this project in Azure DevOps.
Step 1: Create a New Azure DevOps Project
Log in to your Azure DevOps organisation
Click on “New project”
Enter a project name (e.g., “Sentinel-Deployment”)
Choose visibility (private)
Click “Create”

Step 2: Import the Repository
Navigate to Repos in your new project
Click “Import” under the repository dropdown
Enter the source repository URL or upload a zip file of the repository
Click “Import”

Step 3: Create the Resource Group in Azure
Before setting up the service connection, we need to create the Resource Group that will contain our Sentinel resources.
Log in to the Azure Portal (https://portal.azure.com)
Navigate to “Resource groups” in the left navigation
Click “+ Create”
Select your subscription
Enter “SentinelRG” (or your preferred name) for the Resource Group
Select your region (e.g., "UK South”)
Add your Azure Resource Tags (if applicable)
Click “Review + create” and then “Create”

Step 4: Configure Azure Service Connection
A service connection is required to deploy resources to Azure. Let’s set this up:
Navigate to Project Settings (bottom left corner)
Select “Service connections” under Pipelines
Click “New service connection”
Select “Azure Resource Manager”
Choose “Service principal (automatic)” for authentication method
Select “Scope level” as “Subscription”
Select your subscription
Select the “SentinelRG” Resource Group you created in the previous step
For service connection name, enter “DeploymentConnection”
Ensure “Grant access permission to all pipelines” is not selected (We’ll revisit this later)
Click “Save”
Note: If your organisation requires more restricted permissions, you can:
Create a custom service principal in Entra
Assign the necessary permissions (Contributor to the target subscription or resource groups)
Use “Service principal (manual)” authentication method
Provide the service principal ID, tenant ID, and secret
Note: This is going to create a Service Principal In Entra ID, so you may to elevate your level of permissions to do this step

Note: This is going to create a Service Principal In Entra ID, so you may need to elevate your level of permissions to do this step
Step 5: Configure Entra ID Security Admin Service Connection
While the Resource Group-scoped service connection is sufficient for basic Sentinel deployment, certain advanced features like User and Entity Behavior Analytics (UEBA) and upcoming data connectors feature (yet to be implemented) require directory-level permissions. Here’s how to set up the service connection with the necessary permissions:
After creating the service connection, you need to assign the Security Administrator role in Entra ID. Follow the appropriate method based on your organisation’s configuration:
Standard Role Assignment (Without PIM)
If your organisation does not use Privileged Identity Management:
Navigate to the Microsoft Entra admin center (https://entra.microsoft.com)
Go to “Identity” > “Applications” > “Enterprise applications”
Search for the service principal that was created (the name will look like this “azure-devops-Sentinel-Deployment-00000000–0000–0000–0000–000000000000”)
Navigate to the service principal properties
Select “Roles and administrators”
Click “+ Add assignment”
Search for “Security Administrator”
Select the role and click “Add”
Role Assignment Using Privileged Identity Management (PIM)
If your organisation uses Privileged Identity Management for just-in-time role activation:
Navigate to the Microsoft Entra admin center (https://entra.microsoft.com)
Go to “Identity Governance” > “Privileged Identity Management”
Select “Microsoft Entra roles”
Click on “Security Administrator” from the roles list
Select “Assignments” > “+ Add assignments”
Search for your service principal (the name will look like this “azure-devops-Sentinel-Deployment-00000000–0000–0000–0000–000000000000”)
Select the service principal
Under “Assignment type,” select “Active” (not “Eligible”)
Set “Assignment type” to “Permanent”
Provide a justification such as “Required for Sentinel deployment automation”
Click “Assign”
Note: Unlike user accounts, service principals cannot interactively request role activation, so they must have permanently active assignments in PIM environments.

Step 6: Create and Assign Custom RBAC Role for Deployments
Even with the Resource Group-scoped service connection, we need to ensure our pipeline service principal has the necessary permissions to deploy resources using ARM/Bicep templates. Let’s create a custom RBAC role with minimal permissions:
Save the following JSON to a file named
azure-devops-deployment-role.json:
{
  "properties": {
    "roleName": "Azure DevOps Least Privileged Deployment",
    "description": "Minimal permissions to deploy Azure resources using ARM templates",
    "assignableScopes": [
      "/subscriptions/YOUR-SUBSCRIPTION-ID-HERE"
    ],
    "permissions": [
      {
        "actions": [
          "Microsoft.Resources/deployments/read",
          "Microsoft.Resources/deployments/write",
          "Microsoft.Resources/deployments/validate/action",
          "Microsoft.Resources/deployments/operationStatuses/read"
        ],
        "notActions": [],
        "dataActions": [],
        "notDataActions": []
      }
    ]
  }
}
Replace
YOUR-SUBSCRIPTION-ID-HEREwith your actual subscription ID.Create the custom role using Azure CLI:
az role definition create --role-definition azure-devops-deployment-role.jsonAssign the custom role to your service principal:
# Get the object ID of your service principal
$SERVICE_PRINCIPAL_NAME = "azure-devops-Sentinel-Deployment-00000000-0000-0000-0000-000000000000"

# Assign the custom role to the service principal at subscription scope

# Option 1: Using Azure CLI from PowerShell
$SERVICE_PRINCIPAL_ID = az ad sp list --display-name "$SERVICE_PRINCIPAL_NAME" --query "[].id" -o tsv

# Option 1: Using Azure CLI from PowerShell
az role assignment create --assignee "$SERVICE_PRINCIPAL_ID" `
  --role "Azure DevOps Least Privileged Deployment" `
  --scope "/subscriptions/YOUR-SUBSCRIPTION-ID-HERE"

# Option 2: Using PowerShell cmdlets
$SERVICE_PRINCIPAL_ID = (Get-AzADServicePrincipal -DisplayName $SERVICE_PRINCIPAL_NAME).Id

# Option 2: Using PowerShell cmdlets
$subscriptionId = "YOUR-SUBSCRIPTION-ID-HERE"
New-AzRoleAssignment -ObjectId $SERVICE_PRINCIPAL_ID `
  -RoleDefinitionName "Azure DevOps Least Privileged Deployment" `
  -Scope "/subscriptions/$subscriptionId"
This custom role follows the principle of least privilege by granting only the minimal set of permissions required for deployment operations:

Why This Role Is Necessary:
Even though our service principal has Contributor access to the target resource group, it needs subscription-level permissions to initiate deployments. This custom role provides those permissions without granting excessive access to other resources in the subscription.
Important Note: If you’re using Azure Policy with strict enforcement, you might need to add additional permissions to this role based on policy requirements. Monitor your pipeline logs for permission-related errors and adjust accordingly.
Step 7: Create Pipeline Variables
Navigate to Pipelines
Create a new pipeline based on the azure-pipelines.yml file
Click “Variables” in the pipeline editor
Add the following variables:
RESOURCEGROUP: SentinelRG
WORKSPACENAME: SentinelLAW
REGION: uksouth
DAILYQUOTA : 0
SENTINELSOLUTIONS: “Azure Activity”, “Microsoft 365”, “Threat Intelligence”
ARSEVERITIES: “High”, “Medium”, “Low”
Step 8: Save the Pipeline and Run
Save and run the pipeline
You will receive a warning on the pipeline that it needs authentication against the service principal we created earlier, click view and permit the authentication

Allow the pipeline access to the service connection Review the progress of each stage
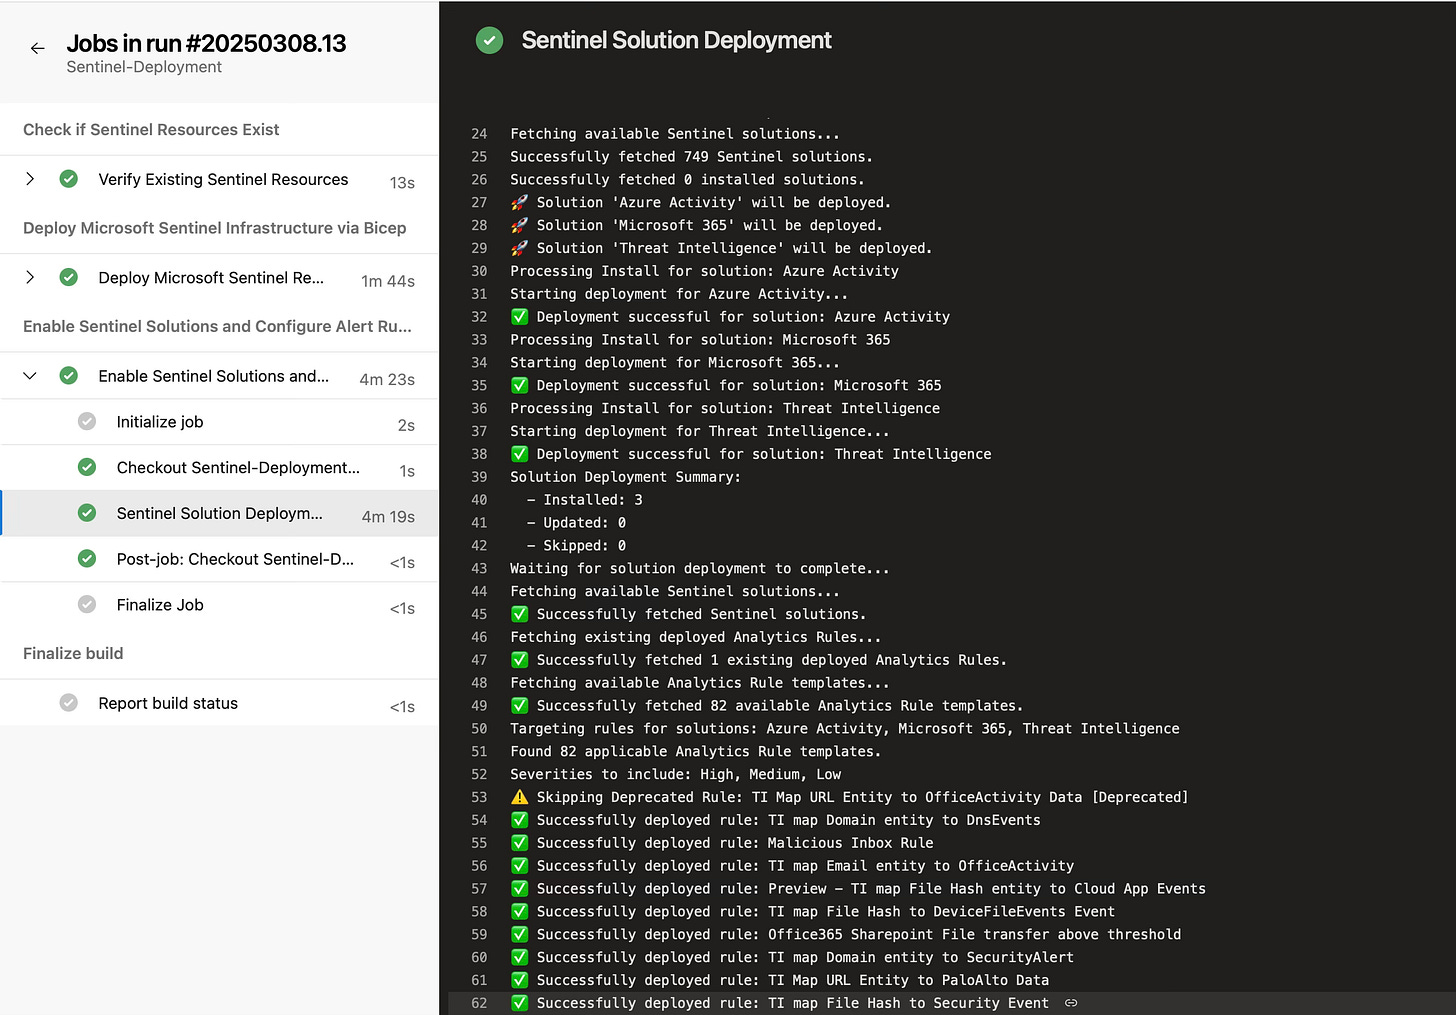
Pipeline Deployment Verify successful deployment in the Azure portal


Understanding the Pipeline Workflow
The pipeline consists of three main stages:

Stage 1: CheckExistingResources
This stage performs a critical check to determine if Sentinel resources already exist in the target environment. It uses Azure PowerShell to query for the Log Analytics workspace and sets a pipeline variable based on the result.
- stage: CheckExistingResources
  displayName: 'Check if Sentinel Resources Exist'
  jobs:
    - job: CheckResources
      displayName: 'Verify Existing Sentinel Resources'
      steps:
        - task: AzurePowerShell@5
          # ... configuration ...
          Inline: |
            # Check if the Log Analytics Workspace exists
            $law = Get-AzOperationalInsightsWorkspace -ResourceGroupName $resourceGroupName -Name $workspaceName -ErrorAction SilentlyContinue
            if ($law) {
                $resourcesExist = "true"
            } else {
                $resourcesExist = "false"
            }
            # Set pipeline variable
            echo "##vso[task.setvariable variable=RESOURCES_EXIST;isOutput=true]$resourcesExist"
This stage is crucial for preventing duplicate resource creation and enabling idempotent deployments.
Stage 2: DeployBicep
The DeployBicep stage provisions the necessary infrastructure using Bicep templates. It only runs if the resources don’t already exist, as determined by the previous stage.
- stage: DeployBicep
  displayName: 'Deploy Microsoft Sentinel Infrastructure via Bicep'
  dependsOn: CheckExistingResources
  condition: and(succeeded(), eq(dependencies.CheckExistingResources.outputs['CheckResources.CheckSentinelResources.RESOURCES_EXIST'], 'false'))
  # ... jobs and tasks ...
The Bicep deployment creates:
Log Analytics workspace
Sentinel solution
Stage 3: EnableSentinelContentHub
The final stage deploys the Sentinel content using our powerful PowerShell script. This stage runs regardless of whether the infrastructure was deployed in the previous stage, ensuring that content stays up-to-date even in existing environments.
- stage: EnableSentinelContentHub
  displayName: 'Enable Sentinel Solutions and Configure Alert Rules'
  dependsOn:
    - CheckExistingResources
    - DeployBicep
  condition: always()  # Ensures this stage runs even if DeployBicep is skipped
  # ... jobs and tasks ...
The Set-SentinelContent.ps1 script handles:
Deploying Sentinel solutions from the Content Hub
Configuring analytics rules based on specified severities
Deploying associated workbooks
Properly linking all resources with metadata
The PowerShell Script: Set-SentinelContent.ps1
The heart of our solution is the Set-SentinelContent.ps1 script that handles the deployment of Microsoft Sentinel content. This script uses a unified testing framework to determine the status of various Sentinel resources and handles deployment, updates, and metadata association.
Key features include:
Unified Status Testing: Uses a consolidated function for checking resource status
Intelligent Update Management: Skip or force updates based on requirements
Professional Error Handling: Graceful handling of errors with detailed reports
Comprehensive Deployment: Handles solutions, rules, and workbooks in one script
Benefits of Automated Sentinel Deployment
Consistency and Reliability
Manual deployments are prone to human error and often result in configuration drift between environments. Our automated solution ensures consistent deployments across development, testing, and production environments. Every configuration detail — from solution selection to rule severity — is codified and version-controlled.
Time Efficiency
What would typically take hours of manual configuration can be reduced to minutes with automated deployment. This frees up security teams to focus on critical security tasks rather than repetitive configuration work.
Scalability
For organisations managing multiple Sentinel instances across different subscriptions or tenants, this solution provides the scalability needed to maintain consistent security monitoring at scale.
Audit and Compliance
All deployment activities are logged and can be traced back to specific pipeline runs, providing an audit trail for compliance purposes. This is particularly important for organisations in regulated industries.
Real-World Use Cases
Enterprise Security Operations
Large enterprises often maintain multiple environments for different business units or regions. This solution allows for centralised management of Sentinel deployments while accommodating environment-specific configurations.
Managed Security Service Providers (MSSPs)
MSSPs can leverage this automation to rapidly deploy standardised Sentinel environments for new clients, ensuring consistent security monitoring capabilities from day one.
DevSecOps Integration
Security teams can integrate Sentinel deployment into their broader DevSecOps pipelines, enabling security monitoring to evolve alongside application infrastructure.
Advanced Configuration Options
The solution supports various advanced configurations through additional parameters:
.\Set-SentinelContent.ps1 `
    -ResourceGroup "Security-RG" `
    -Workspace "MySentinelWorkspace" `
    -Region "UKSouth" `
    -Solutions "Microsoft 365","Threat Intelligence" `
    -SeveritiesToInclude "High","Medium","Low" `
    -ForceSolutionUpdate `
    -SkipRuleUpdates
These parameters provide granular control over the deployment process, allowing for customised behaviours based on specific requirements.
Best Practices and Considerations
Security Considerations
While automating Sentinel deployment is powerful, it’s important to maintain proper security controls:
Use service principals with the minimum necessary permissions
Secure pipeline variables, especially for production environments
Implement approval gates for production deployments
Regularly audit service principal permissions
Testing and Validation
I recommend implementing a staged approach to deployment:
Deploy to a development environment first
Validate that solutions, rules, and workbooks are properly configured
Verify that alerts are triggered as expected
Promote to production using the same pipeline with different variables
Environment-Specific Configurations
Different environments may require different sets of solutions or rule severities. Use environment-specific variable groups in Azure DevOps to manage these configurations:
Conclusion
Microsoft Sentinel provides powerful security monitoring capabilities, but its deployment and configuration can be complex and time-consuming. The Sentinel-As-Code project offers a comprehensive solution for automating the entire Sentinel deployment process using Azure DevOps pipelines.
By combining infrastructure-as-code with PowerShell automation, this solution enables consistent, efficient, and scalable Sentinel deployments across multiple environments. Security teams can focus on what matters most — investigating and responding to security threats — rather than spending hours on manual configuration.
I encourage you to try this solution in your organisation and experience the benefits of automated Sentinel deployment. The project is open-source, and contributions are welcome to enhance its capabilities further.
Next Steps
Clone the repository and adapt it to your organisation’s needs
Set up a test deployment in your Azure environment
Customise the solution list and rule severities based on your security requirements
Integrate the pipeline into your existing CI/CD processes
With this solution, you’re taking a significant step toward modern, automated security operations — one that will save time, reduce errors, and improve your overall security posture.